- Get link
- X
- Other Apps

Upload App on Google Play Store Part-I

Congratulations, you have created the app successfully. Now it's time to launch it for public use.
So you come to the right place. 🥳
Currently, there are three main stores:
App Store (Owned by Apple Company)
Google Play Store (Owned by Google Company)
Huawei App Store (Owned by Huawei)
There are numerous ways to establish apps. For Android, we can use a native approach and cross-platform framework such as Flutter, Reactive Native, ionic, etc.
This article consists of two parts.
The first Part is about How to build an App bundle for Android
native application and for Flutter App.
Then Second part will cover how to create an app on the Google play store
and publish it.
If you already know all these things, you can directly jump to Part-II
Prepare App Bundle for Android Native App:
Step:01
Add App name, icon, and round icon in AndroidManifest.xml file
under application tag.

Step:02
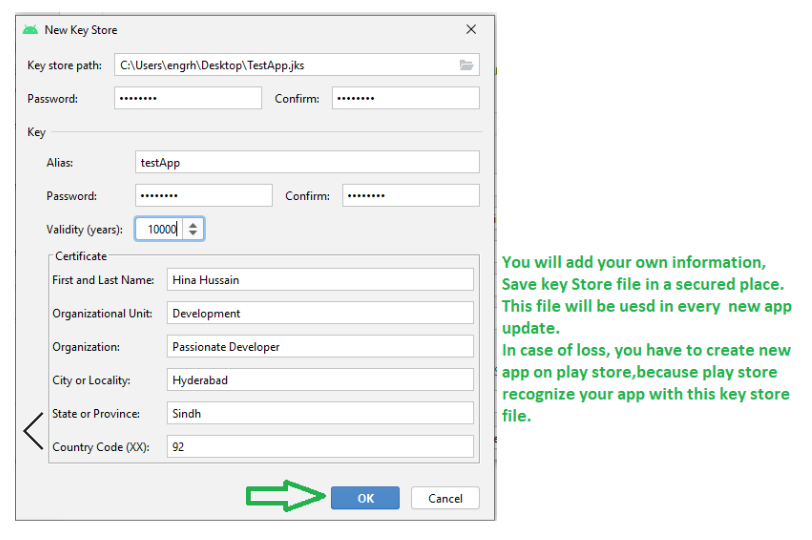
Create Key Store/JKS file, if you don’t have one.
In the android studio, for an android native project, we can create Key
Store/JKS and app bundle using IDE options.
Go to Build->Generate Signed Bundle/APK

Select the Android App bundle option because it is recommended to publish bundle instead of apk. Then click next.


And You are done with the app bundle.
Step:03
Before uploading it to the play store, extract apks from that bundle and test it to check each functionality is working properly.
Use the below command on the terminal to extract apk from the bundle:
java -jar "path to your bundle tool" build-apks -- bundle="path to your app bundle" -- output="path where output should be saved" -- ks="path of key store file that have created " --ks-pass=pass:yourpassword --ks-key-alias=your key alisa --key-pass=pass:yourpassword
java -jar "F:\bundletool-all-1.2.0.jar" build-apks --bundle="E:\Android_Studio_Projects\Test\app-release.aab" --output="E:\Android_Studio_Projects\Test\out_bundle_archive_set_signed4.apks" --ks="E:\AndroidProjectsOffice\SapphireAttendanceApp\APK_Bundles\Attendance-App-Keystore.jks" --ks-pass=pass:123456 --ks-key-alias=key --key-pass=pass:123456
Bundle tools are jar files that you can download from the GitHub repository.

After executing the above command, the .apk folder will create rename that folder with zip. Then extract that zip folder, and in the standalone folder, the above apks will be shown. Pick mdpi apk and test it on your device before publishing.
Prepare App Bundle for Flutter App:
Step:01
Step 01 is the same add App name and icons in the Android manifest file.
Step:02
Create Key Store/JKS file, if you don’t have one.
In flutter, we will use the below command to generate the key store file.
for windows
keytool -genkey -v -keystore c:\Users\USER_NAME\key.jks -storetype JKS -keyalg RSA -keysize 2048 -validity 10000 -alias key
for mac/Linux
keytool -genkey -v -keystore ~/key.jks -keyalg RSA -keysize 2048 -validity 10000 -alias keyThis command will generate a key.jks file in the specified path.
Step:03
Now Refer key store file in the android project.

Create key.properties file inside <app-dir>/android/key.properties and add below commands:
storePassword=testpassword
keyPassword=testpassword
keyAlias=testkey
storeFile=D:/keystore.jks //your_home_directory
Step:04
Now configure app/build.gradle file.
Add below code snippet before the android tag.
def keystoreProperties = new Properties()
def keystorePropertiesFile = rootProject.file('key.properties')
if (keystorePropertiesFile.exists()) {
    keystoreProperties.load(new FileInputStream(keystorePropertiesFile))
}
ndk { abiFilters 'arm64-v8a', 'armeabi-v7a', 'x86', 'x86_64' }
  signingConfigs {
        release {
            keyAlias keystoreProperties['keyAlias']
            keyPassword keystoreProperties['keyPassword']
            storeFile file(keystoreProperties['storeFile'])
            storePassword keystoreProperties['storePassword']
        }
    }
    buildTypes {
        release {
            signingConfig signingConfigs.release
        }
    }
    bundle {
        language {
            enableSplit = true
        }
        density {
            enableSplit = true
        }
        abi {

            enableSplit = true
        }
    }
Step:05
Build apk. First, run the below command.
Flutter clean
flutter build appbundle --release
Here we are done with all steps!
In Part-II we will learn how to upload this app bundle into Google Play Store.
Stay tuned
Happy Coding 🎉🎉🥳🥳
Comments
Post a Comment